Friday, July 28, 2017

Biasing Dual Gate MOSFETs

 First step is to determine if the MOSFET you are using is external biased or internal biased and if it is internal is it fully are semi biased. The biasing will be like this:

 The BF998 and BF908 are external biased devices so they need gate and source dividers. The table establishes the values needed to bias the amp

The BF904, BF909 and BF1100 are semi-biased and the biasing is less complicated.


 The BF1105 and BF1109 are even less complicated since they are fully biased.
 This data came from the Ap Note linked below. You can download it for more information.

Biasing Dual gate MOSFETs

 Here is a diagram for a functional BF2040W amplifier. I inserted the values from the datasheet. Everything here came from the BF2040W datasheet. Maybe the background from the the BF998 Ap Note will make it easier to understand.


Wednesday, July 26, 2017

Track inductance vs ground plane.

The prototype board data gives details which include the length of the tracks between components. For a short wave radio this might be overkill but for a FM receiver it could be worth looking into. One suggested use for the BF2040W was a FM receiver. An aircraft band receiver could be in the making too. Does the foil length effect the amplifier operation? Remember a straight wire will have inductance and at high frequencies the inductance will effect the circuit response.  Now consider this:
If positive feedback creates regeneration which creates oscillations maybe we should be aware of the foil inductance and the benefit of the ground plane?

Tuesday, July 25, 2017

BF2040W Three layer board.

My last board was a real encouragement so I took the next step. Pursuing the goal of layered construction I came up with another scheme. A cross between manhattan and ugly construction.
I'm using a prototype board for the component layout and a double sided board for ground plane and Vcc.
I don't want to cover the base board I just want an island to build on. I cut strips for the assembly.
The manufacturer's Eval board looks like this. My board will provide the same basic function without having to etch it. The large red area is the ground plane. The small red area is AGC. The small strip is the Vcc.

This 3" X 4" board could be used to make 5 amps when laid out as above.
I'll just start with one but I will work close to an end so I have room for another later.

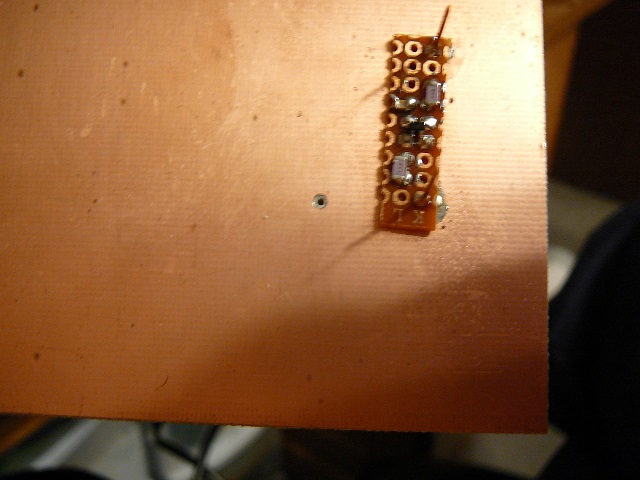
I will need grounds and I need to anchor the strip. I solved both problems by soldering some pins to the ground plane and mounting the board on them. I tinned four pads for the chip to mount on.

Just in case some one is wondering my soldering iron is nothing special. A smaller one might be better but I use what I have.
I mounted the chip and the input and output coupling capacitors.
This is the only "trick" with this method. I need access to Vcc which is the lower foil.I drilled a hole for the wire and then used a bigger bit to remove some foil around the hole so my wire will not short out as it passes through.
I need about 4 volts for AGC so I connect a 10K and 100K resistor in series an solder one end to the ground plane and the other to the Vcc on the bottom foil. The center point will be AGC. ( you could use a 20K and 100K to be closer to 4 Volts.)

Gate 1 connects to Vcc through a 100k resistor so I drilled a hole (as before) and connected it. Connecting gate 2 to AGC completes the biasing.
The source is grounded and the drain goes to Vcc through an inductor. I added a couple of more pins on the top of the board for input and output.
The finished amp ready for testing.
Compared to the one I made yesterday it is more compact. The test will be in how it works.  I powered it up and connected my headphone to the output and it just clicked when connected. I put a diode across the phones and I hear the local radio station news broadcast. I tried the first one and found they function about the same.
Now, what could a fellow do with it? maybe a diode ring mixer in the center of the board and use it as a RF amp feeding the mixer. Then another amp connected to the mixer output as an IF amp. Another diode mixer as a detector. Maybe just add a tuned circuit up front and make a TRF receiver.
Gotta be another project in there!

Monday, July 24, 2017

BF2040W Amp prototype

A couple of TRB members have told me the ground plane is very important. This week end I was listening to a lecture from a man who owns a company that makes and sells electronic gadgets. He suggest a layered construction. The RF on top with a ground plane under it and the power connects under the ground plane. He has the boards made using 4 layer methods. While it is a great method it doesn't lend itself to a build and modify person like me. So I adopted a different approach which may work for a galoot like me. I cut a thin slice from the end of a 2X4 board. It is about 1/8". I drilled the four corner holes of the board and prepared to mount it.


I put copper tape on the bottom of the board to form a ground plane and a Vcc bus.


The black line helps me know where to find a ground or Vcc. I tinned four pads to take the chip.


Position the chip an apply a little heat to mount it to the board.


The method presented was to create the DC circuit first so i soldered a 100k and a 10k resistor to produce the voltage for biasing gate 2. A second 100k resistor biases gate1.


I put a capacitor on the input and output.


A bypass capacitor on gate 2 to prevent cross modulation.


Now for the test.  Dip meter feeds  a signal.


It is giving a gain and the signal looks good. I attach an 8 foot test lead for an antenna. I put my headphone on the output. Nothing. This is good. Put a diode and capacitor across the headphones and hear my local station. No signal without the diode tells me it is not oscillating, if it was I'd hear the beat.


This amp will produce audio output with my test lead antenna attached. The capacitor with full length leads is causing it to oscillate. The bare copper wires are ground and Vcc. I  wonder if it would be more tame with the layered construction? Another project for another day!
One inductor, three capacitors, 4 resistors and 1 BF2040W is all it took to build this one active device radio. Now all it needs is a tuning circuit. The voltage divider sets the gain so it could be replace with a pot and would act as a gain/volume control.


Sunday, July 16, 2017

App Note 95 Eval board for BF2040W family of devices

AN095
This app note give the data for building the amp with a parts list and PC board data for Eagle, etc.

Saturday, July 15, 2017

BF2040W Biasing data

BF2040W biasing data

BF2040W Biasing data later version.

The first link give the data as a new component being presented.
The second post just gives the data with no explanation.

Wednesday, July 12, 2017

BF2040 RF Amp

What can a radiotrician do with a dual gate MOSFET RF Amp?
First look at the data sheet.

BF2040 Dual Gate MOSFET - RF Amp tethrode

some excerpts from the manufacturer's catalogue.


1 BF2040 and a handful of parts and you have a high gain, high frequency, stable RF amp.
I'll assemble one in a later post.


Sunday, July 9, 2017

Using DBM as a frontend converter for a radio. Where to begin?

This is going to be a short excursion into converters. The basic plan is one unit fits all needs. I want a fixed LO and use the receiver to tune the signal. Simple enough? I'll try not to complicate it.
Now let's consider the basic circuit diagram and some more conversion signals.

The red vertical line is zero hertz and the lower image is below zero?

The block I called antenna circuit and filter image rejection could be broad band amplifiers to boost the RF and first IF signals. The DBMs will produce signal loss and the amps would compensate. I have built a single DBM converter and it works without the RF amp but I am using a receiver with a 3uv sensitivity.