Wednesday, January 15, 2025

A new look at transformers.

Back in 2016 I made a few post about transformers. My one follower made one for his AM modultor. At that time I linked a book with the formula and tips on winding your own. Since then the link has been broken. It seems someone at the blogger control center decided the link was " unaceptable content. Feb 20 2016 I posted a little data showing how thw mutual inductance effects the operation. Basically as long as the primary has sufficient inductance you can simplify the process. One old rule of thumb is to use 5 turns per volt BUT this calls for a large piece of iron. I use 10 turns per volt to insure the primary is large enough. The transformer I wound has 120 volt primary and 10 turns per volt. So 1200 turns for the primary. I wanted 6.3 volts on the primary. so I need 63 turns ( used 65) for the secondary. Once I made the transformer I tested the inductance and "built" a circuit in LTspice to test the design. The primary was 3.5 Henry and the secondary was 18 milli Henry. Spice says I should get 7.7 Volts. Next I will power it and see..........

Wednesday, December 11, 2024

Bandspread vs range continued from previous post

If you observed the effects of adjusting the Vcap ratio by adjusting the low end capacitance and the high end by adjusting the "trimmer" It should be easy to understand the importance of making the adjustments in order. The 600KC adjustment sets the bandwith while centering the range over the correct dial point. The 1400KC adjustment sets the high scale to the correct point. You must work between the two to get the proper operation of the set. Both effect both ends of the scale so the 1400KC could be adjusted without first setting the 600KC and then you are looping back and forth with to wide a band. You can set the dial to 1400KC and adjust either one adding the low range adjustment while reducing the high range adjustment and hold the output steady. Anywho here are a couple of excert from the service manual.
The alignment procedure on one sheet.

Monday, December 9, 2024

Setting the bandset for a LC tuning circuit.

As simple as I can state it the tuning range is determined by the CIRCUIT high to low capacitance. When you look at a schematic you may se the Vcap range is 0pfd to 360pfd but that is just the Vcap you will also find trimmers and strays in the circuit. The sim's work through a series showing the hi-lo tuning with a Vcap and strays. Once the circuit is set and the range determined I adjust the strays to show the effect. Then I use the same circuit and adjust the inductor. You should be able to see the ratio of hi-lo capacitance sets the tuning range while adjusting the inductor shifts the band being covered. One way of looking at it is the band being covered is definrd by a VEE. By adjusting the capacitance you widen or reduce the VEE's width. Adjusting the inductor will slide the VEE across the band to establish the center point. We can hit a brick wall when aligning a set by making the wrong adjustment first. Consider this: the range is defined by the (VcapHI plus strays) / (VcapLO plus strays). Look at the schematic, do you see capacitors in the tuning circuit? You must add them to the Vcap values to establish the range. Next time you find an impossible to align set consider this: set the dial to the low point and find the frequency being received. set the dial to the high point and find what frequency is being received. Divide the measured high by the measured low and square it to determine the actual tuning range. Divide the dial high by the dial low and square it to determine the desired tuning range. If they are not close it is time to examine the extra components in the circuit. So the goal is to set the width of the VEEs arms and the center point of the range. Hummm? Makes me wonder about that "set the dial to 1400kc and adjust...". Oh well now for some screen shots.

Thursday, February 23, 2023

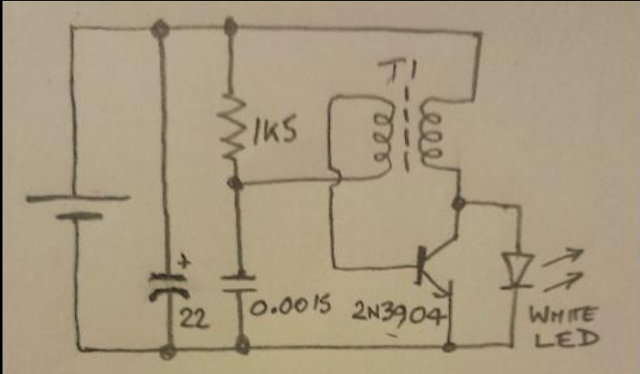
Charging and discharging a coil to power a joule thief.

Notice the time delay when power is switched on. 

The CEMF in the coil delays the current buildup. 

The current continues to build as long as power is applied. 

When the input falls the current decays just as it increased when it was applied.

The voltage (green) reverses polarity.

The current (red falls just as it rose in the same polarity.

What you need to see here is the EMF produces current which produces CEMF opposes the current. There is a time delay as current builds and as current falls.

The inductor opposes change in current. This delay in rise and storage then delays the decay as it releases the energy back into the circuit.

How does the voltage reverse in the green waveform? The current is unidirectional and the polarity is determined by seeing the coil as a source or sink. 

(sinking)

As it is drawing power from the power source the bottom terminal is negative and the top terminal is positive. 

(sourcing)

As it returns energy to the circuit the top terminal is negative and the bottom is positive.

With this in mind look at the joule thief.

If the 2N3904 is switched on the coil is directly across the battery. The top is positive and the bottom is negative.

As the field builds in the coil it couples to the base coil and turns the 2N3904 off.

As the field collapses the current is maintained with the top of the coil negative and the bottom positive.

As you can see the diode "sees" the battery voltage and the coil voltage in series and the voltage is the sum off the two.

This is how can a "dead" cell powers a LED that requires between 2 and 3 volts.

As we know there is no such thing as a free energy (outside nuke). What we have here is energy conversion. The low voltage is stepped up as the current is maintained for a short period of time.

Power is a function of time. We dissipate 1mw of power in 1 millisecond or 1 microsecond. To produce the power the short pulse would be higher voltage or current. 

A tip of the hat to the ladies and thanks for the project idea. I can see a couple of joule thiefs in making.


Wednesday, February 15, 2023

A closer look at the joule thief or the facinating world of magnetism

 From its humble beginning 200 years ago our understanding and use of magnetism has come a long way. A short history lesson. 

The telegraph sounder was basically a relay with no contacts. When power was applied it would click. When the power was removed it would clack. The time between the click clack would be long or short and would represent the characters in the message.

click-----clack---------------click----------clack would be the letter A. Many years later we added a closed contact and fed the coil through it. This made a buzzer which was easier (for me) to copy.

The next step after the buzzer was a couple of more contacts feeding a transformer. This allow us to step up the 6v car battery to the thousands of volts needed to feed the spark plug in your car or to power the car radio (the tube sets of that day needed a 100 volts or more.


This was a marvel being able to travel and listen to the radio. It was also a battery killer. You did not forget and leave it on with out the motor running to many times (don't ask how I know this)

So everything is "NEW" and nothing is. The difference today is the transistor being used instead of the vibrator. This 'boost' supply takes 3 volts input and produces 9 volts output.


The one thing they all have in common is the inertia of a magnetic field in a coil of wire. When you apply power the coil opposes the expansion of the field and absorbs energy. When the power is removed the coil opposes a decreases in current and uses the stored energy to maintain current as long as possible. If you apply 0.5 volts through a low resistance copper wire and let the field build to its max current and then remove the source the coil will attempt to maintain the current through any path it can find. So if your source can produce 1ma through the "short" circuit represented by the transistor (switch) and the coil it will maintain that 1ma through the LED as it discharges. There is no free energy but the high voltage pulse is a short duration. The eye blends the pulses of light and it is good.

The ladies did a great job and hopefully learned things from this project that can be applied to future projects.

My latest project was a circuit to power a 12 volt LED from a USB supply. I have a solar charger for the USB supply and a boost supply much like the one above. It works but now I hang my head in shame that I bought the supply when I could have followed the ladies example.

Maybe another project in the making?

Tuesday, February 14, 2023

The DITS get younger as time passes. The Joule thief lamp as built by the new pair.

I heard from DIT and she has a pair of twins she assisted in this build. Check it out. Two more DITs.

Working with as little as 0.3 volts it will truly zap the last joule from a battery.

The finished project operating from a single C cell should function for a very long time.

I am so glad to see more designers in training!

Well done ladies.

Edit: The coils are wound bifilar.


Saturday, February 11, 2023

to regen or not to regen?

 Mr Tom on TNRB posted an interesting question.

Why will this set not perform? If Mr Andersen says it is a good performer we will assume it is. Tom says it picks up local station weakly. What makes this circuit challenging is the ferrite core. L2 60 turns tapped at 10 from the bottom. With an air core coil the first thing would be "phase the reaction". If the two coils were wound separate we could just reverse phase by reversing the wires. With a center tapped coil it is a little more difficult. 


This was the fix. Observe the base bias flow out the base and up to the diode. The .01uf cap places the center tap at AC ground. If the signal flows up the lower coil and down through the .01uf cap the upper coil can conduct in either direction without conflict. 


If the base current flows into the center tap and out the bottom through the diode the center tap is negative. The upper coil will be in conflict with the lower and provide degeneration or in phase and will provide regeneration in the other phase.

The hard question with building the circuit is how are the coils phased. L1 is the transformer primary and the 2 secondaries will have a center tapped phase aiding or opposing.

One other thing with the ferrite core would be to make the coils separate and movable. Sliding the coil along the core will vary its inductance and allow some adjustment of the tuning and the reaction.


One other possible fix would be to reverse the diode and place it between the base and center tap. This would reverse the phase of the lower coil.